

Turbo Replacement Fitting Guide
Click Here For The Printable PDF Version
Before starting read this guide thoroughly and ensure you have the correct tools and parts and have properly assessed the job.
This guide is written specifically for The Figaro Shop turbo charger, extra tools or parts maybe required if original parts have been modified or if a different turbo has or is being fitted, you should also check the condition of all items to satisfy yourself they are serviceable. It should be noted that it is recommended that all original hoses are replaced due to age and risk of failure. For any questions contact The Figaro Shop on 01235 812511.
The cause of the Turbo failure should first be located, else the new one could also fail. Failures could be down to; age, poor servicing, incorrect oil, incorrect oil levels, blocked oil feed\exit pipe or allowing car to idle before switch off.
Please note this information is provided in good faith based on various information sources believed to be accurate. As with anything you should only carry out work with the correct tools and skills. We are therefore not responsible for anything occurring from this information\advice, you are doing so at your own risk!
Tools Needed
- Trolley\car jack
- Axle\car support stands
- Wheel chocks
- Metric socket set: 10, 12, 13, 14, 24mm
- Metric spanners: 10, 12, 13, 14, 15, 17, 19, 20, 22, 24mm
- Torque wrench
- Philips screwdriver
- Flat bladed screwdriver
- Angle grinder or saw and metal file (if oil output pipe and heat shield need modifying)
- Pliers
- Oil filter belt strap\remover
- Clean funnels (optional)
- Oil drain pan \ bowl
- Oil catch container for Turbo priming
- Coolant drain bowl
Parts Needed
- New turbo with gaskets and fittings
- New turbo oil feed with adapter
- Turbo Exit water hose 45 degree 13mm internal diameter x 100mm long: eg: eBay item 351703744078 (recommended if not part of the kit see notes)
- New oil filter PN:A5208-01B02
- Engine Oil: Semi synthetic 10W30 or 10W40 (e.g. Mobil Super) or Fully synthetic oil 0W40 or 5W40 (e.g. Mobil 1) Refilling capacity – approx. 3 litres (plus allow ~0.5l for turbo priming)
- Sump Washer PN: 1102601M02
- Coolant: 50% mixture of ethylene glycol \ propylene glycol antifreeze and or pre-mixed coolant without dilution Normal antifreeze – change every 2 years \ Long life antifreeze – change every 5 years. System capacity approx. 4 litres (recommended)
- ECCS to Turbo metal pipe water hose 90 degree right angle 13mm internal diameter x 160mm long: eg: eBay item 291566190163 (recommended see notes)
- New hose clips (recommended)
- Exhaust Gasket and Paste (optional)
- WD40\Penetrating Fluid (recommended)
- New Radiator drain cock Nissan: PN: 21480R0100 – Nissan dealer: ~£3.60 (recommended see notes)
- New Radiator packing drain washer: PN: 2148118000 – Nissan dealer: ~£0.89 (recommended)
- New Lambda sensor Denso DOX-0125 or DOX-1008 (recommended see notes)
Reference Materials
- Turbo Replacement Options guide – http://figaroownersclubforum.com/thread/5590/
- Figaro JPN TSM (Technical Service Manuals) – http://figaroownersclubforum.com/thread/5583/
- Lubricant and Fluids Guide – http://figaroownersclubforum.com/thread/5599/
- Jacking Points – http://figaroownersclubforum.com/post/16823/thread
- Coolant System and Hoses Information – http://figaroownersclubforum.com/thread/4856/
- Figaro Owners Club – http://www.figaroownersclub.com/
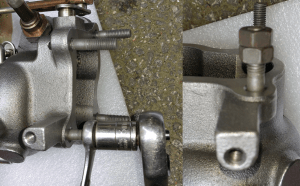
Fig 1. – New Figaro Shop Turbo and supplied fittings.
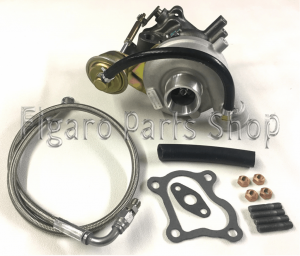
Fig 2. – New Figaro Shop oil feed with adapter.
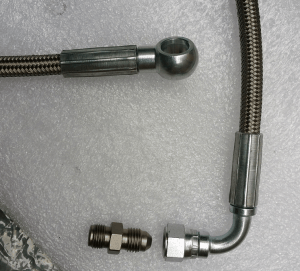
Fig 3. – Nissan Figaro TSM – Turbo Exploded Diagram with Torque Settings
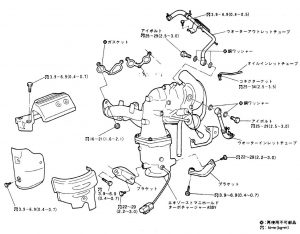
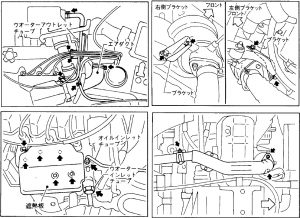
Fig 4. – Nissan Figaro TSM – Key Steps and fixing locations
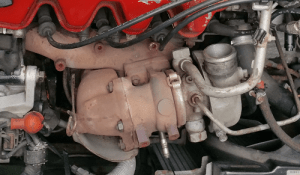
Procedure
- Loosen the 10mm battery clamp nuts and disconnect the battery.
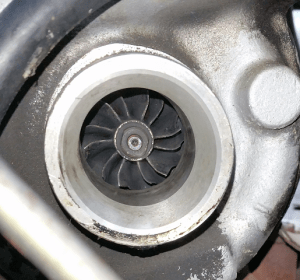
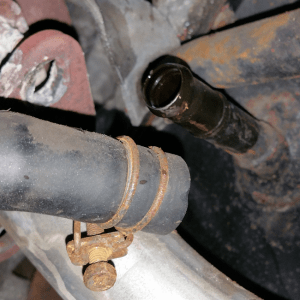
- Fully loosen the big clips holding the large black turbo inlet pipe using a Philips screwdriver or 10mm socket\spanner. Pull the pipe away from the turbo and undo and detach the large and small pipes attaching it to the black air inlet resonator box. This will then reveal the inlet turbine, oil leaking can sometimes be seen around the area and the turbine spindle felt for excessive play.
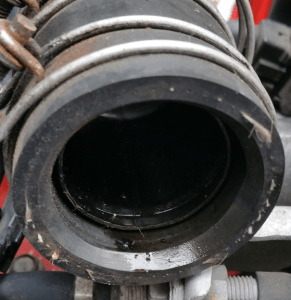
- Fully loosen the four big clips holding the two large rubber hoses to the turbo air outlet, black middle metal pipe and the ECCS air inlet, using a Philips screwdriver or 10mm socket\spanner. Once loose slide the back sections away from the turbo and ECCS and withdraw from the car and inspect. You can clearly see in the below case oil is present, remove the sections from the middle pipe and clean these and the ECCS inlet.
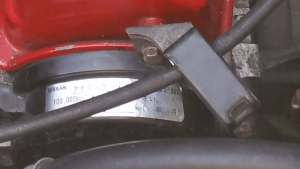
- For ease of access remove the 10mm bolt on the black accelerator cable bracket next to the top cam cover and move the cable with bracket out of the way.
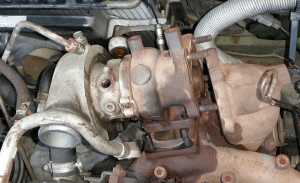
- Remove the 13mm bolt holding the lambda sensor wire connector holder bracket from the top of the turbo, disconnect the wire and remove the bracket, move to one side the feed wire.
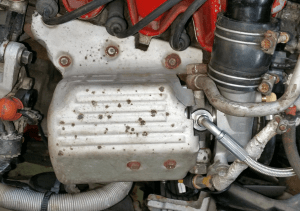
- Remove the four 10mm bolts holding the turbo heat shield to the manifold and 2 bolts attaching it to the turbo, one of these normally has the turbo earth strap attached. These can be tight and snap with age, be gentle and apply some WD40 as needed.

- Remove the heatshield from the car, this can be tight to move around the turbo, pipes and manifold, by bending the bottom section of the heat shield near the alternator can assist.
- Remove the three 10mm bolts on side heat shield from the top cat section and remove the heat shield.
- Remove the four 13mm nuts holding the top cat section to the side of the turbo, pre-soak with penetrating oil such as WD40 if they are tight.
- Using a 13mm spanner remove the four nuts holding the turbo base to the top of the manifold, these are awkward to get to and normally tight, again soak first with WD40. Also using another spanner hooked on the end of the spanner can assist by lengthening the spanner and allowing more force to be applied.
- Next jack up the front of the car and fully support the car on axle support stands and check it’s stable.
- Remove the two 13mm nuts holding the front exhaust section to the bottom of the cat. Remove the gasket, if it is damaged it should be replaced.
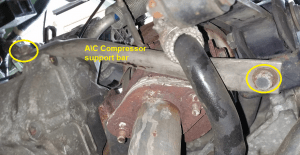
- Remove the two 12mm bolts holding the A\C Compressor support bar and remove from the car.
- Using a spanner and socket remove the 14mm nut and bolt holding the exhaust bracket to the rubber mount. You may find it easier to loosen the pipe clamp as well to allow the bolt to be withdrawn. The front pipe should pull down and withdraw from the bottom cat studs, the pipe should be supported to avoid strain on the rear section and support mounts.
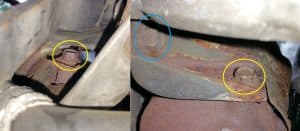
- Remove the two 12mm bolts holding the two Cat side support brackets to the Cat body. Access is limited. It’s also a good time to loosen 14mm bolt holding the bracket to engine block mounts to allow the cat to move.
- Inside the car slide the heater control lever to the hot position, this will open the heater valve and avoid creating an air lock.
- Remove the main radiator cap, then place a bowl this under the radiator and undo the white plastic drain plug on the underside of the radiator and allow the coolant to drain into the bowl. Note there is a thick rubber washer which needs to remain in place as shown. If the drain plug is old it maybe brittle and should be replaced as they do snap off. It’s also worth removing and empting the plastic expansion tank and flushing out any sludge at the same time.
- Once drained replaced the drain plug and fully tighten and then replace the main radiator cap.
- Place a bowl under the sump and remove the 14mm drain plug and allow the oil to fully drain. I normally open the oil filler cap on the rocker cover and add a little clean oil to just flush out any used oil from the bottom of the sump. Once drained remove the old sump washer and replaced with a new one and refit the sump drain bolt and tighten (No settings in TSM, Hayes Micra Mk1 K10 manual says 26-35 ft-lbf \ 35-47 N-m).
- Undo the 12mm turbo oil feed pipe on the top of the turbo.
- From underneath the car reaching up into the back of the engine loosen the oil filter, access is awkward and an oil filter strap\remover is normally required. Place the bowl under the location to catch any oil and fully remove from the car and tip any oil out from it. Clean the area of any oil drips with an old rag.
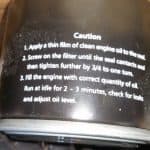
- Remove the new oil filter from the box and the plastic protective cover and check for any damage. As shown below the fitting instructions are normally detailed on the side. Always apply clean oil to the new seal and tighten as per the instructions.
- The original Nissan TSM details cleaning the original fixed pipe out using compressed air as over time this gets clogged and the internal diameter reduced. However it is recommended that the old oil feed pipe is replaced with a new flexible wider bore version as provided in the kit from The Figaro Shop. To do this remove the 10mm bolt below the distributor which attached the oil feed pipe to the block and then remove the oil feed pipe from the car. The bracket can be removed from the old pipe by prising apart the open section and the plastic part discarded, then, first checking the relative position to the old pipe, carefully refitted to the new oil feed, ensure that the flexible pipe is not crushed or damaged.
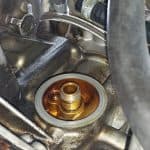
- Using a 19mm spanner to hold the square oil sensor adapter in place and at the same time loosen the 17mm turbo oil feed banjo bolt and then fully remove as shown below. Retrieve the copper washers from either side of the banjo as these and the bolt are re-used.
- Route the new oil feed hose via the same route as the old pipe, ensure it does not foul anything and is not damaged, kinked or
- twisted. The angle of the banjo and the top turbo connection is in correct alignment without kinking the hose. Ensure the copper washers are fitted over the bolt both sides of the banjo and tighten the 17mm banjo bolt whist holding the adapter as before. There is no mention of torque setting in the original TSM, but do not overtighten.
- Refit the 10mm bolt holding the pipe bracket to the engine block there is no mention of the torque setting in the original TSM.
- Undo the 10mm clip from the turbo oil exit pipe going into the side of the sump and remove the pipe.
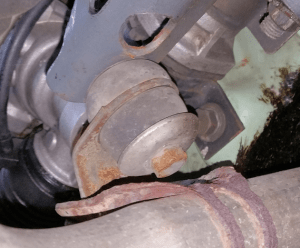
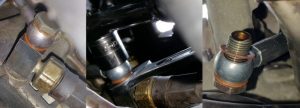
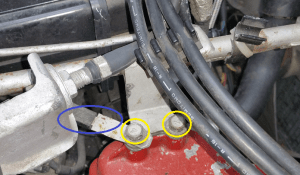
- Undo the two 24mm bolts attaching the water pipe banjos to the side of the turbo, retrieve the copper washers from either side of each banjo as these and the bolts are re-used.
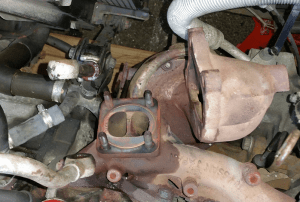
- Separate the top cat section from the side of the turbo by pulling it way, retrieve the metal gasket if re-using.
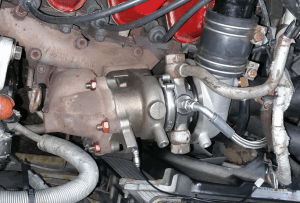
- The turbo should now lift away from the top of the manifold, this maybe tight and as the oil exit pipe is attached this needs to be navigated up with it.
- Once removed from the car the turbo and manifold can be fully inspected. Cover the manifold top to avoid dropping anything down which could later cause damage.
- Unpack and inspect the new turbo for any damage or faults. Leave the foam and plastic plugs in place till fitting the pipes top avoid contamination.
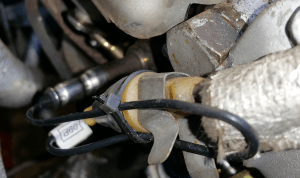
- It is recommended to fit a new lambda sensor, however if it has been recently replaced and considered serviceable and has not been contaminated and is being re-used, then use a 22mm spanner or lambda Socket to remove. These can be very tight especially if it’s never been replaced, be careful not to damage, it may be simpler to just replace with a new one.
- Fit the four studs to the side of the turbo, an easy way to tighten the studs fully is to use two nuts locked together on the end of the stud and then tighten the stud using the end nut as shown. Don’t overtighten these otherwise thread damage will occur.
- Undo the two 10mm bolts holding the metal oil exit pipe from the old turbo noting the pipe fitment position, clean the pipe and ensure that there is no contaminates that can re-enter the oil system.
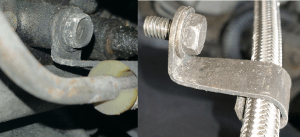
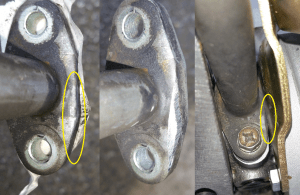
- Remove the blanking plug from the turbo and offer up the metal pipe with the new supplied gasket to the new turbo and check that the bolt holes and pipe position are in alignment. The new turbo designs have been found to fowl the turbo actuator bracket and therefore in these cases require a sight modification by removing the edge material as shown below, before doing so ensure the pipe ends are sealed and kept clean of any metal fillings. To fit the pipe tighten the 10mm bolts fully to the supplier recommended torque (the original turbo was (2.9-3.6 ft-lbf \ 3.9-4.9 N-m).
- Remove the two 10mm bolts holding the metal turbo water feed pipe bracket to the top of the rocker cover, note an earth connector also present. Move the pipe away from the turbo area.
- Remove any foam or packing from all of the cavities of the turbo (leave the red pipe inlet and covers in place for the moment) and locate onto the top of the manifold. Fit the new Turbo side to top Cat gasket, ensure it’s the correct way round and position over the four studs.
- Refit the four nuts onto the turbo base to manifold top these are awkward to fit and its best to just put the nuts on very loosely initially to allow the turbo to be lifted slightly to locate the remaining nuts, then tighten fully evenly to the supplier recommended torque (the original turbo was 16-21 ft-lbf \ 22-29 N-m).
- Relocate the top cat pipe over the studs ensuring the gasket is in place and not damaged. Refit the four nuts and tighten fully evenly to the supplier recommended torque (the original turbo was 16-21 ft-lbf \ 22-29 N-m).
- Refit the two 12mm main bracket to cat support bolts (16-21 ft-lbf \ 22-29 N-m). Retighten the two 14mm bracket to block (2.9-5 ft-lbf \ 3.9-6.9 N-m).
- Refit the A\C Compressor support bar the correct way round and tighten the two 12mm bolts (Nothing in TSM, Hayes Micra Mk1 K10 manual says 22-30 ft-lbf \ 30-40 N-m).
- Refit the exhaust to bottom cat, replacing the gasket and applying any exhaust paste if needed. Fit the washers and tighten the 13mm nuts (~26 ft-lbf \ ~35 N-m).
- Using a spanner and socket refit the 14mm nut and bolt holding the exhaust bracket to the rubber mount and tighten the bracket strap (~12 ft-lbf \ ~16 N-m).
- The new Turbo’s normally have the connections in a slightly different position. As such the following steps are needed to re-align the pipes and connections.
- Loosen the clips on the 90 degree water pipe going from the ECCS to the metal turbo water feed banjo. If this is an original pipe then it is recommended that it is replaced as detailed in the parts list.
- Remove any plastic bung in the turbo and locate the engine side turbo water banjo against the turbo, refit the 24mm bolt with the two copper washers either side and tighten loosely.
- Reposition the water pipe and refit the 10mm bolts holding the bracket and earth connector on top of the rocker cover. There is no mention of torque setting in the TSM, but do not overtighten.
- Reposition the 90 degree hose so it’s not kinked and is firmly connected both ends and tighten up both hose clips. Fully tighten the engine side 24mm water banjo to the supplier recommended torque (the original turbo was 18.4-21 ft-lbf \ 25-29 N-m).
- Loosen the hose clip on the radiator side turbo water banjo pipe and remove any plastic bung from the turbo and reposition and refit the 24mm bolt with the two copper washers either side and tighten loosely. The new turbo’s position is higher meaning that the original 45 degree water pipe is really too short to fully locate both ends up to the pipe ridges, additionally if this pipe is original it should really be replaced anyway, the Figaro Shop kit includes a replacement. Undo both clips remove the old pipe and offer up the new hose and measure (twice!) and cut the hose to fit firmly connected both ends and tighten up the hose clips. Fully tighten the radiator side 24mm water banjo to the supplier recommended torque (the original turbo was 18.4-21 ft-lbf \ 25-29 N-m).
- Recheck the radiator drain plug is in place and tight and the heater control is set to hot, refill the coolant system slowly from the top of the main radiator, if using coolant concentrate add this first and then fill with remaining water, also fill the expansion tank to max.
- Recheck the oil drain plug and oil filter are in place, remove the dipstick and oil filler cap and slowly refill with new oil to max dip stick mark.
- Remove the Coil HT lead coming from the distributor, move the lead well away from the coil.
- Check that nothing is loose of fowling any belts or moving parts. Ensure the car is in Park with the handbrake on.
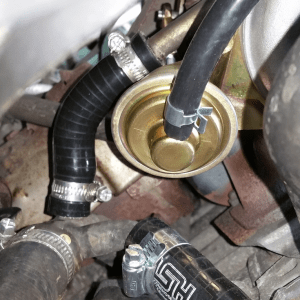
- Place the turbo oil feed pipe into a suitable clean container to catch oil and monitor flow.
- Clear the engine compartment and work area of tools and loose objects.
- Re-connect the battery.
- With caution and standing clear of the engine, crank the engine over, watching the oil pressure light to ensure it goes out and monitor the amount and quality of oil coming out of the hose until at least ½ pint (300 ml) of clean oil is pumped out of the turbo oil feed pipe. This ensures any dirt or carbon particles are flushed out, which otherwise may get in and damage the turbocharger’s bearings.
- Switch the ignition off and disconnect the battery.
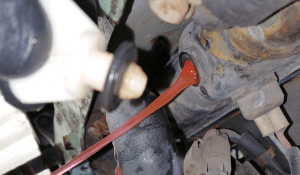
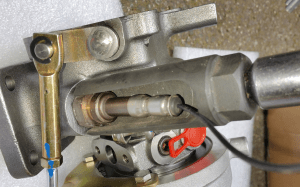
- Wipe excess oil from the hose and remove the plastic blanking plug from the turbo and fit the oil feed adapter into the turbo using a 13mm spanner and then route the oil feed to the adapter, before fully tightening with a 15mm spanner ensure the hose is not fowling, strained or kinked. Tighten both to the supplier recommended torque (the original turbo fixed hose was 18.4-25 ft-lbf \ 25-34 N-m).
- Empty the oil from the container and place the sump end of the turbo oil exit pipe into the clean container to catch oil.
- Clear the engine compartment and work area of tools and loose objects.
- Re-connect the battery.
- With caution and standing clear of the engine, crank the engine over, watching the oil pressure light to ensure it goes out and monitor the amount and quality of oil coming out of the hose. Once happy with the output, switch the ignition off and disconnect the battery.
- Wipe excess oil from the pipe and refit fully the hose to the sump pan ensuring the hose is not kinked or fowling anything. Fully tighten the hose to sump clamp.
- Refit the large turbo air inlet and outlet pipes, tighten the clips fully.
- Refit the 13mm bolt holding the lambda sensor wire connector holder bracket from the top of the turbo (no torque setting listed in the TSM), reconnect the wires and position any excess wire, cable tie if needed.
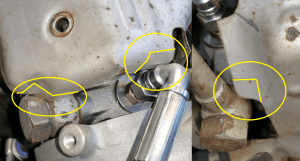
- Offer up the turbo heat shield, the new turbo position has changed and it will normally fowl the two water banjo pipes and the oil feed. In these cases mark the sections as needed as shown below.

- Either use pliers to bend the heat shield sections out of the way or remove the excess material with an angle grinder or saw and then clean the edges with a metal file.
- Refit the heatshield in place using the four 10mm bolts holding the turbo heat shield to the manifold and 2 bolts attaching it to the turbo (no torque setting listed in the TSM), ensure the turbo earth strap is also reattached and the other end is still attached to the body.
- Reposition the black accelerator cable and bracket next to the top cam cover and refit the 10mm bolt no torque setting listed in the TSM).
- Check that the HT leads on the spark plugs have not been disturbed in the fitting process.
- Refit the main HT lead to the coil.
- Re check everything is back in place and properly tightened including anything you and additionally removed.
- Recheck for any leaks.
- Lower the car and remove the stands.
- Check the oil and coolant levels and top up as needed.
- Refit the oil filler and coolant caps securely.
- Clear the engine compartment and work area of tools and loose objects.
- Re-connect the battery and tighten the securing nuts (no torque setting listed in the TSM).
- With caution and standing clear of the engine at all times, start the engine, watching the oil pressure light to ensure it goes straight out. Do not rev the engine, allow it to just idle for a few minutes and monitor for any leaks. Listen for any unusual noises. There may be some initially slight smoke or smell from the new turbo, residual fluids and any exhaust paste used. If there are any issues or concerns then switch off the ignition immediately.
- Switch off the engine and re-check the oil level is above minimum and top up as needed. It should be noted that oil is normally checked when cold and having run the engine the oil will read lower as it will still be in the system until it drains back to the sump. Therefore ensure you do NOT overfill the system and it should be properly checked again when cold.
- Re-check the coolant level in the expansion tank and top up as needed. Do not remove the coolant cap as once it heats up the pressure with case boiling water to spray out. Top up the expansion tank to the position marked. It should be noted that having drained the system air will likely still be in the system and it should be closely monitored and it should be properly checked again when cold.
- Once satisfied everything’s OK and there are no leaks then start the engine and allow to warm up. Constantly monitor the water temperature stays normal (needle stays about midway and where the two dots at the base of the needle are), and that the oil pressure light remains off throughout. Once up to temperature the fan should kick in and out to maintain the temperature, also check with the A/C off that the heater is blowing hot air from the top screen demist and floor foot positions (note face blows cold only).
- Switch off and recheck again and then take it for a test drive, keep the revs low to allow the new turbo to bed in slowly.
- Once left to cool recheck for any leaks and recheck and top up the oil and coolant system – again only remove the main radiator cap once cold and ensure its full and the expansion tank is midway between min and max.
- Note down the date and odometer reading and ensure that the oil and filter is changed regularly according to the schedule to maintain and prolong the life of the engine and turbo.
- As normal monitor for any leaks and recheck the levels regularly.
Copyright
© 2017 All rights reserved, No part of this document may be reproduced, stored or transmitted in any form without prior written permission.
Disclaimer
We accept no responsibility and disclaim all liability of any kind for any action which any third party takes or refrains from taking on the basis of the contents of this document.